I made the jump to iPhone back in 2018/2019 when Android 9 was the new hotness, but kept my 2016 Google Pixel around for Pokémon GO until I thought its battery met its untimely demise. Coincidentally my Pixel 4A came with Android 12 already on it and its gorgeous Material You. The rooting process was more or less unchanged, but some recent developments in apps like Magisk that are the preferred rooting method now didn’t quite work as well for me, so I opted to downgrade from Android 12 to Android 10, at least to make sure I can do what I wanted to do.
Now 2 years removed from the Google Pixel 4A’s release and the state of Android and other apps available at the time, I put these steps together primarily so I have something to easily reference in the event I have to go through the rooting process again…Cuz I can’t stay it’s fun trying to research things from scratch for the second or third time.
Get organized
First thing’s first: Get the stuff together that you’ll need.
- Install Android Platform Tools to connect the PC and phone
- Download Android 10 factory image for Sunfish
- Extract the files somewhere, and then extract boot.img from the image-sunfish___.zip
- Magisk Manager: Manage Magisk modules
- Smali Patcher Magisk Module: Patches and repackages a bunch of the Android framework into a Magisk module to root
- Yet Another Safetynet Attestation Checker (YASNAC): Checks whether the phone will pass Safety Net
Download TWRP: The TeamWin Recovery Project is a custom Android Recovery tool that allows wide-ranging access to root your phone. XDA has some other helpful information. Unfortunately, there’s no official TWRP build for the Pixel 4A like everything else, and the available test build requires a custom kernel to be installed. Not today!
Unlock the bootloader
Unlocking the bootloader will wipe the device; the Flashing Instructions section basically has it covered.
- Enable Developer Settings and in them, enable OEM unlocking & USB debugging
- Plug in the phone, and accept any prompts on both the phone and PC
- Reboot into the bootloader using either steps 4 or 5:
- PowerShell terminal command:
adb reboot bootloader
- Turn the phone off and then hold Pwr + VolDn to boot into it
- Unlock bootloader with the command:
Fastboot flashing unlock
- After unlocking, the phone will be wiped.
Flash Android
I had to do this anyway to downgrade from Android 12, but it’s helpful if you mess something up and need to start from scratch regardless. Just make sure ADB can access the phone.
- Navigate to the directory where you unpacked the factory image (there will be some files like bootloader___.img, flash-all.bat, etc.
- Run flash-all.bat to flash stock Android…it’ll take a few minutes and reboot several times
- Go through the setup
- Enable the permission to install apps from unknown sources
Become root
The first fun part is coming up!
- Unpack boot.img from the bootloader___.img file if you didn’t already and send that to the phone
- Send the Magisk Manager & YASNAC APKs to the phone and install.
- Open Magisk Manager and tap Install Magisk, browsing to the boot.img location
- It’ll patch boot.img so you can send it back to your PC. I’ll hypothetically name it bootpatch.img
- Reboot into fastboot
adb reboot bootloader
- Flash the patched boot image file
fastboot flash boot bootpatch.img
- It’ll take a few minutes, but after its down reboot
fastboot reboot
- Once phone reboots make sure it’s unlocked and connected to PC
Patch the root
The next few steps are to patch the now rooted install
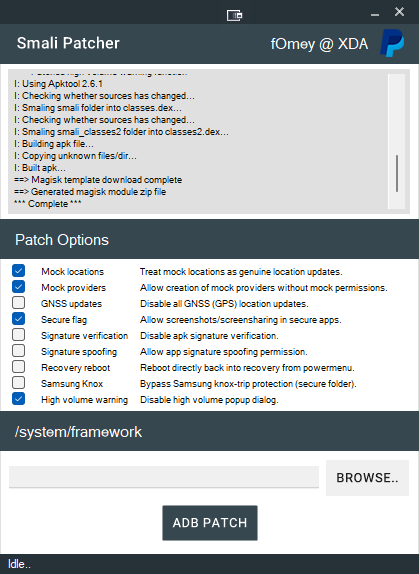
- Run SmaliPatcher.exe; it’ll download anything needed on the first run.
- Choose Patch options (should just be Mock locations, Mock providers, Secure flag, and High Volume warning
- Click ADB Patch without selecting a path
- After a few minutes, output like this:

- Once that’s done, a zip file starting with “SmaliPatcherModule%” will be created in the directory. Download that to the phone
- Open Magisk Manager and install the module, then reboot
- Open Magisk Manager and enable Zygisk in settings, then reboot
- Rename Magisk Manager to something you’ll recognize but that doesn’t include the word “Magisk”
- In Magisk Manager settings, enable Zygisk and reboot.
- Install FakeGPS Apps and Pokemon Go
- In Magisk Manager settings, add to the Deny List the Google Play Store and any other apps you want to hide Magisk from
- Set FakeGPS as the Mock Location app in Developer settings
- In FakeGPS settings, uncheck both these options
- In FakeGPS uncheck both Android 10 FusedLocationApi & Smali Patcher Mode
- Android 10 FusedLocationApi: Causes Error (12) in Pokémon Go
- Smali Patcher Mode: Causes Error (11) in Pokémon Go
- Set your location to a place of interest at least a few miles away from your current location & make sure your little dot stays there
- Fire up Pokémon Go
That’s all there is to it! It seems way more complicated than it truly is, and hopefully this helps some of the 12 people who are out there with a Google Pixel 4A running Android 10. One day, I might even give Android 12 another shot! I do love that UI, but it seems like Android 12 has made some major moves to lock things down more.